
As discussed in the previous installment of this series, correct seat position is the key to achieving pelvic stability on the bike. Steve Hogg explains.
Correctly finding the right seat position will maximise power, comfort and efficiency. There are two major aspects to gaining good seat position: seat height and seat setback as well as the peripheral issues for the purposes of this article of equipment choice and structural fitness. So let’s start at the start!
Seat Height
What we are trying to achieve with correct seat height is the greatest amount of leg extension consistent with maintaining power and control. As a rule of thumb, most people do not have neuro muscular coordination good enough to control more than the middle 80% of the range of movement of any joint. Many have less. As a result, seat height is not merely a matter of sitting as high as a rider can physically reach, but more a matter of sitting as high as they can to control the movement well. What are the variables here? As far as the body goes they are: leg length, relative proportions of upper leg to lower leg, size of foot, proportions of foot, knee and ankle joints, flexibility of the lower back, hip flexors, hip extensors, calves and a whole lot more, and pedalling technique.
As far as equipment goes the variables are: seat type and compressibility, shoe choice and the amount of heel lift in last shape, sole thickness of the shoe and the height implications of various cleat/pedal systems. This sounds fairly complex doesn’t it? Well it isn’t really. What we need to do is sit at a height where, under reasonable load, we can reach the bottom of the pedal stroke with a bit in reserve. I would define reasonable load as a gear relative to conditions, where a rider is working hard at 75-85 rpm, but not so hard that they have to compromise technique.
Why under this kind of load? Because under these circumstances almost all riders will drop their heels more than they do at higher rpm. Generally the tendency at high cadences is to point the toe more, as this reduces the range of movement that the hip, knee and ankle have to move through. This in turn means that more revolutions can be performed in a given time. By setting your seat height at a lower, heel dropping cadence, which stretches the leg out, there is less danger of sitting too high.
For instance, if you set your seat height at a higher cadence, you may well find that you are sitting too high to ride up hills well. Hill climbing calls for a higher torque and lower rpm technique than flat riding and the seat only has to be a little too high to noticeably limit performance.
I mentioned seat height should be such that you are reaching the bottom of the stroke with a bit in reserve. Why? Because not every day is the best day of your life. Some days we are tighter and less flexible than others. This is common in winter. Also after several days of hard riding, most people are tighter than usual. So your seat height should be such that you can cope with these circumstances with ease.
How do you know that you are sitting too high? A little bit of common sense goes a long way. If you are noticeably too high, it should be patently obvious on a longish ride over a variety of terrain. If only a little too high, expect tightness and soreness at the top of the hamstrings immediately under the glutes, soreness and tightness at the head of the quads immediately above the knee or soreness behind the knee. Any or all of these can be commonly caused by a seat set a little too high.
If the seat is too low, it is harder to injure yourself unless it is radically too low. The symptoms are usually pressure or pain at the front of the knee, tightness or soreness high in the upper leg in front of the hip, or a general feeling of lacking power on hills.
If in doubt about your seat height, experiment with raising or lowering it. Over time you will work out what is right for you. I wouldn’t place too much emphasis on the commonly used leg length multiplied by a number method as, like most statistical norms, it may not have much relevance for any given rider. This method (usually expressed as inseam length x 1.09 or inseam length x 0.883 plus crank length) does not account for differences in equipment, leg proportions, foot size, flexibility or pedalling technique. In short it is a simple, easy to apply, and generally useless method.
An example, I know what my inseam measurement, upper and lower leg lengths and foot sizes are. I position hundreds of people of all levels of accomplishment each year. Two or three times a year someone walks in the door with legs and feet that are in proportion and length the same as mine. I have kept a record over the years of the seat heights that those riders with ‘my legs and feet’ have ended up with. The range is just over 40 mm, or in imperial speak, more than an inch and a half. This is accounted for by differences in the factors I mentioned earlier, but pedalling technique under load is the major difference.
But to talk more about pedalling technique differences we need to discuss…
Seat Setback
How far behind the centre of the bottom bracket should a rider sit? The obvious answer is, `whatever is correct for that rider performing in their particular discipline’. A quick word here. This series of articles will deal with, unless otherwise mentioned, road riding. Triathlon, track, MTB and touring will be dealt with separately in this series of articles.
What are we trying to achieve by correct seat setback? Pelvic stability and the involvement of all the musculature of the upper legs in harmony and equilibrium and the concurrent spreading of the pedalling load over the greatest muscular area. Done correctly this will maximise power, endurance and speed of recovery.
What are the variables? Foot size relative to leg length, proportional length of upper leg, gluteal mass and pedalling technique. There is a short cut to all of this, which I will explain later. For the moment I will take the scenic route and explain each in turn.
It is reasonably important that you know whether you have a large, small or average foot length, relative to leg length. And if your foot is larger or smaller than average by this measure, then by how much? If you have a large foot relative to leg length you will need to sit further back than the rider with a smaller foot relative to leg length, so that the ankle can do its job of smoothing out the pedal stroke properly. Conversely, if you have a small foot proportionally then you don’t have to sit as far back.
If you are proportionally long in the upper leg then you need to position your seat further back than if you are proportionally shorter in the upper leg. This is to minimise strain on the knee whilst maximising leverage.
If you have a large backside, whether fat or muscle, then you need to sit further back to position yourself skeletally in the same position relative to the bottom bracket as you could achieve with a smaller backside. If you lack gluteal mass, the converse is the case. An example of this from my files is Cameron Hughes, an Australian rider whom I have known for 10 years. Then he was an 80 kg club rider without much fat and with a fair bit of muscle. He got quite serious about his riding, got me to position him and has been racing successfully in Australia and Europe with a lot less muscle at 68 kg. This has become his normal race weight and at this weight he has won Queensland Road Championships, placed second in the National Road Championships, top three in the National Road Series, etc, so it suits him. He has had the same position for four years, apart from minor tweaks.
He emailed me from Europe a couple of months into this season complaining of tendonitis in both knees and asking that I send him a detailed diagram of his positional parameters in case his bike was not set up properly. I asked lots of questions but his answers did not give me any grounds to advise him. Months later, in frustration, he got me to send him his previous season’s bike, set up correctly from the info in my files. This made no difference. His season ended prematurely, he returned to Australia three days before the 235km Grafton to Inverell.
Cameron came in requesting that I solve his problem because the next step was surgery. I looked at him on the bike and made two observations: that he was sitting 10 mm too far back and that he was even skinnier than usual& – he was 61 kg as it turned out. Measurably the seat was in the place I had put it when Cameron was 68 kg. But at 61 kg, it was too far back because with less padding behind his pelvis he was sitting skeletally further back. In his case, patellar tendonitis was the result. I moved his seat 10 mm forward, re-jigged the bars and stem and three days later he rode the Grafton with only minor irritation and no need for knee surgery. That is as good an example as you will get about how gluteal mass affects seat setback. If Cam puts weight back on in this area then again his seat will need to move back.
Pedalling Technique
Pedalling technique is the last of the variables I mentioned before. Some books would have you believe there is a correct technique. There isn’t. I will put it in these terms. Your upper leg is your primary lever and your foot is your secondary lever when pedalling. If your natural technique is to drop the heel significantly under load, you are gaining a lot of leverage from your foot. However, that same heel dropping technique stretches the leg out and the seat height has to be lower to compensate. A pronounced heel dropping pedalling style can be summarised as: ‘lot of leverage/short stroke’.
If your natural style is to point the toes, then you are gaining less leverage from your foot than the previous example, but because of the extra reach afforded by this technique, you have a longer stroke and greater seat height. We could call this: `less leverage/longer stroke’. Bearing in mind these are extremes and most riders fall somewhere in the middle, is one better than the other? No. Pedalling technique can be trained but under high heart rate, high load conditions, most people revert to what comes naturally. It is better to set your parameters of: seat position and cleat position, accept what comes naturally and refine it by doing it a lot.
If you want examples of how little pedalling style matters, get some old tapes of Eddy Merckx and Jacques Anquetil. Both were the great riders of their respective eras but they had opposite extremes of pedalling style. If you want a local example, watch the National Road Series this year. The 2001 winner, Peter Milostic is a high rpm rider with heel down throughout the whole stroke. Two times Australian Criterium champion, Warren Doyle is a high rpm toe pointer and somewhere in the middle with a more moderate technique is Eddie Salas, 1999 Road Series winner.
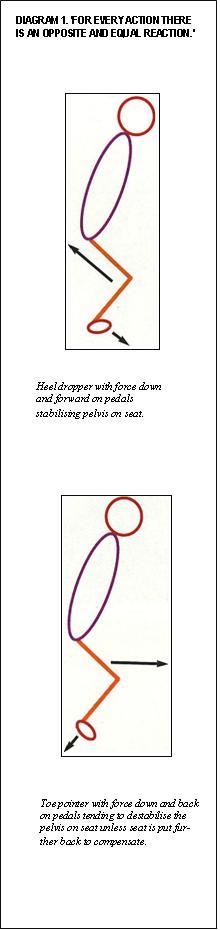 What has all this got to do with seat setback? A lot. See Diagram 1. The more a rider drops their heel, the more they arc pushing themselves back in their seat and stabilising their pelvis.
The more a rider points the toes, then the more the major vector (direction of force) on the pedals is rearwards. This will tend to drag the rider’s weight forward and destabilise the pelvis unless the seat is set further back to compensate. A hypothetical example. We have identical twins who are measurably identical, but pedal with opposing extremes of technique. The heel dropper will sit lower and need a steeper seat angle than the toe pointer who will sit higher and need a slacker seat angle.
Remember the short cut I mentioned before we took the scenic route? It is this. Position your seat so that as the crank is descending towards the bottom of the stroke, the front of the knee is slightly behind the first metatarsal joint (ball of the foot) under load, with whatever pedalling technique you display under load. This is assuming average foot length to leg length proportion. For a proportionally longer foot, sit a little further back and for a proportionally short foot then slightly further forward will achieve the right result.
An explanatory note is required here. All of the foregoing in this article assumes a fairly symmetrical, structurally fit human being. Many of you aren’t. If you want to improve your cycling then take up yoga, tai chi, Pilates, Alexander Technique, the Feldenkrais Method or similar. Physical fitness is more than muscular strength and cardiovascular efficiencyit also requires a reasonable range of movement in all the joints and good posture. Most people fail this test. Work on this aspect and improve your cycling and your general well being.
The trick with positioning is to achieve power, comfort and efficiency while working around the structural shortcomings most people display to varying degrees.
Additionally, all the information contained in this article only works if the foot/pedal relationship is correct. Which is what I’ll tackle in the next instalment.
Other articles of interest:
Why Do Cyclists Really Shave Their Legs?
Cycling Heart Rate Zones Explained – How To Use Heart Rate Monitor And Zones To Improve Your Cycling
How To Work Out Your Cycling Heart Rate Zones
Introduction To Cycling Power Zones
[VIDEO] – Why it’s important to ride your bike through winter
How to Get Fit During the Winter Months – The Most Effective Winter Cycle Training
How To Get Back On Track With Your Winter Training – Winter Cycle Training Tips
Off-the-bike strength training for cyclists
Check out our training products
Slow Down To Speed Up Your Hill Climbing – Cycle Up Hills Fast


Leave A Comment