In this article, I discuss my review of the Gloworm XSV Front light system and the reasons for deciding to choose this bike light over others in its class.
My previously light, the Ay-Up
I purchased an Ay-Up light back in the early 2000s for winter road training while riding in Melbourne’s urban roads. In its day it was powerful and compact bike light that provided good run time. In recent years I purchased a 3rd-party Race Ware 3d printed Ayup GoPro mount so that I could hang it from the Go-Pro mount at the bottom of my K-Edge Garmin Pro Combo Mount to keep it all nice a tidy and out of the way of handlebars.
The Ay-Up light has been a fantastic and ultra-reliable lighting unit. I’ve had absolutely no issues with it and being weather sealed, I can ride all day in the rain with the confidence that I won’t break it. I liked it so much that I brought one for my wife for her training as well.
The Ay-Up, like many lights of this bred, comes from the adventure and mountain biking background. These lights are generally powerful, robust, weather-sealed and have good run times. Everything that I’m looking for in a light.
Excellent for training on urban roads
I used the Ay-Up light for two reasons. The first reason was to be seen by other road users. During the winter I like to ride with a front light both in the dark and during daylight. The Ay-Up light is bright enough to grab the attention of a motorist and helps ensure that I’m seen and reduces the chance of them pulling out of a side street in front of me.
The second reason was to be able to see where I was going. Melbourne’s street lit urban roads don’t require powerful lights at night but some of the parts of my rides were unlit. The Ay-Up light provided enough light for this and make sure that in the dimly lit part of urban roads were sufficiently illuminated to see potholes or other debris in front of me.
Move to Mansfield
When I moved to Mansfield in rural Victoria things changes. Unlike the reasonably well-lit urban streets of Melbourne, in Mansfield, the street illumination runs out quickly as soon as I left the limits of the township. Once out on open roads, my rides were pitched into total darkness. While the Ay-Up’s 700 lumens provided enough illumination to see the road in front of me it wasn’t nearly enough.
A few weeks into one of my morning pre-dawn winter riding I encounter a wombat. While I managed to dodge it and avoid a serious accident, for safety reasons I decided to put an end to any further training rides done before sunrise or after sunset.
The Ay-Up was still my go-to light during the day for winter riding. It helped keep me visible especially while riding through the mist that I encountered on the Tolmie and Whitfield road.
Move to Adelaide
Then we moved to Adelaide and after a few weeks, I decided that an Adelaide hills loop ride was going to be a big feature of my weekly training rides.
I use Greenhill Road to get access to the Adelaide hills. The Greenhill Road hill is a great hill that’s long enough to provide good training for building strength on the bike. A lot of riders do Norton Summit Road, but I find that it’s not steep enough nor long enough. Plus, I like the ride out to the base of Greenhill Road better than to Norton Summit Road climb. Oh, and the descent down Montacute Road is a lot smoother than Norton Summit Road.
Like Mansfield, it doesn’t take long to pitched into darkness pre-sunrise while riding up Greenhill Road. Once I get to the top there is very patching lighting for much of the ride across the tops until I get to the Montacute Road descent.
So after over ten years of great service, I was looking for a brighter light to replace my ageing, but still reliable, Ay-Up.
The requirements
- I wanted a really bright light with good peripheral lighting – After experimenting with several lights to gauge how much brightness I was looking for. I worked out that I needed something at least 2,000 lumens so I could see in front of me on the darker sections of the road. As I’ve encountered a few kangaroos on my early morning rides having good lighting to the side of my bike is important too. Most road lights will light the road in front of you, but the beam is too focused to pick up a possible rogue kangaroo lurking at the peripheral.
- I wanted a light that flashed – This is for coming back from my ride to draw attention to the other motorists in normal commuter traffic. The Ay-Up had a flashing mode in later models but my model didn’t have this mode.
- I wanted good run time – My training rides are usually two hours long during the week and three hours or more during the weekend, so I want the main light to be able to provide illumination and safety during the winter for this duration.
- I wanted it to have a Go-Pro mount – I wanted a light that I could attach to my Garmin Pro Combo Mount so that it’s away from my handlebars. Lots of lights mount to handlebars and many of them look like a torch that’s been retrofitted to work on a bike. They are long and stick out all over the place. For me, they just look untidy and out of place. It didn’t want that.
- I wanted it to be affordable – Yep, you can spend a heap of money on bike lights, $1,000 in fact! I was willing to pay around $400 for the light.
The search
After a few hours on the web, I narrow it down to a few lights. Wanting a light to mount to a Go-Pro mount rules out a lot of them. Some have accessories that you can buy that will convert them to a Go-Pro mount but then you might have to find a place that sells the light and also the mount accessory.
In my search, I came across the Gloworm range of lights. And in their range, they have the Gloworm XSV front light. It’s got three LED’s with a widespread beam, a good runtime and the Go-Pro mount comes standard as part of the kit. Oh, and it’s made in New Zealand and as I’m a kiwi, I had a little bias towards it.
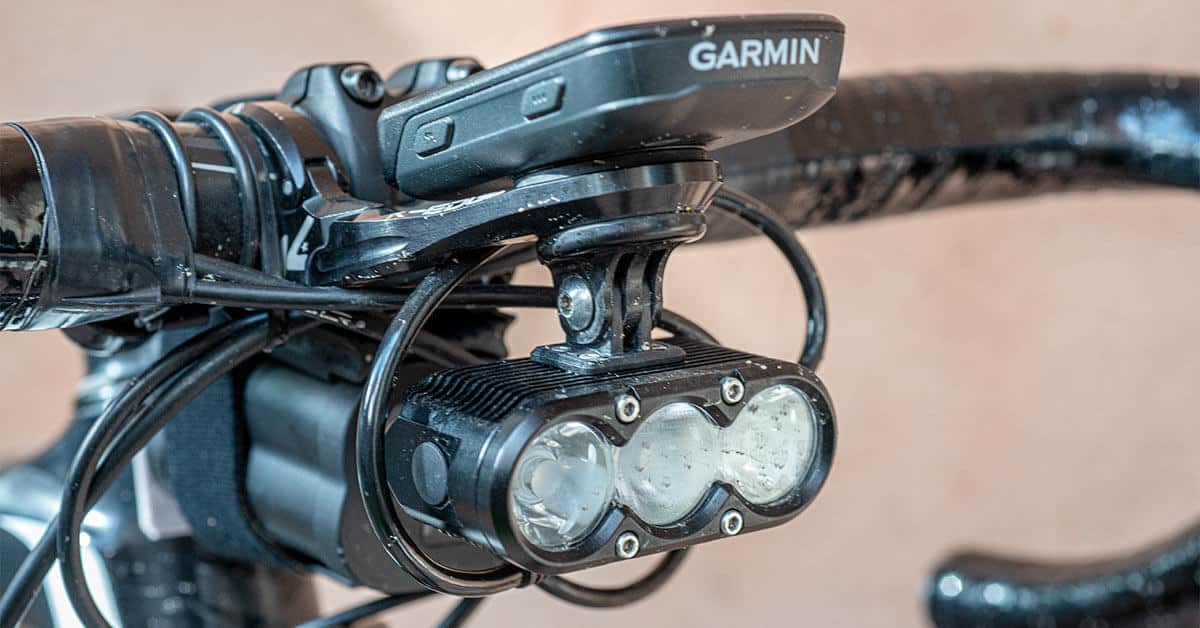
The Gloworm XSV front light
Gloworm XSV front light is an upgrade to their smaller XS front light. It has three Cree XHP 50.2 LED’s, throwing out a stunningly bright 3,400 lumens and weighs in at 430g with the associated cables, strap, and mounts. It’s designed to be mounted on a mountain bike as a floodlight and paired with a more focused beam helmet-mounted light. Sounded ideal for me so I got one.
The Gloworm XSV front light Beam
The Gloworm XSV front light comes with three “spot” lenses as standard but comes with ‘wide’ and ‘flood’ lenses to customize the beam to your liking. I found the beam produced with the standard configuration more than amble for my road riding (and for spotting lurking kangaroos). It’s bright and wide enough. The throw is maximized in this configuration so it’s great for high speed descending in the dark on roads. It’s good to have options to configure it if you wanted a wider beam, perhaps for mountain biking. I didn’t need to change it and used it straight out of the box.
What you get

It comes with the waterproof light unit, a 6,800m Ah Lithium-Ion 4-cell battery that has a run time of 1.5 hours on full power (which is super bright, more on this later), a wireless remote, extension cables for mounting the battery pack further away from the light like down the top tube, or if you helmet mount it, in your back pocket. It has a range of mounting options that will cover everything you need including a Go-Pro mount as standard.
I didn’t need any of the accessories; just the light, the battery, and the Go-Pro mount. The wireless remote would be good if you need to adjust the light when it’s out of reach. I have the light mounted just below my handlebars I can reach down and safely switch the light though the various modes while riding. I don’t like clutter on my handlebars so the remote has stayed in the box. I’ve been told that the remote can be easily paired with the light and other Gloworm lights, but I haven’t touched it.

Light settings
Out of the box, the light has a low, medium, high, and super dim setting as well as a flashing mode. I’ve read that the super dim mode is designed to be used to save power when you are in total darkness and not moving. This feature is a great idea for mountain bikers or perhaps if you were riding with mates on the road and needed light to fix a puncture. I’ve never used it.
I use the low setting when riding through the streets of Adelaide on my way out to the Greenhill Road then once I get on the climb, I’ll switch to the medium setting which is more than enough light as I climb up into the darkness.
It stays on this setting till I get to start the descent back down into Montacute Road at which time I place it on high to get the best reach with the light while descending with speed. Once I’m back in commuter traffic I place it on the flashing mode.
The flashing mode is a little unique in that it is a solid light with a high-intensity flash. Most flashing lights are flashing only. I like what Gloworm has done here because if I’m riding through traffic at dusk, I can place it on the flashing setting, and I get the best of both worlds. A light that alerts other motorists with a high-intensity flash that really pops and the illumination to see where I am going.
Finally, the low, medium, high, and super dim setting can be adjusted in 10% increments. I haven’t touched these as I’m happy with the defaults setting right out of the box. There is a whole video that Gloworm has put together that explains how to configure this.
Battery
The battery comes with a LED gauge on it. The battery provides a 1.5 hour run on the high mode. I’ve never used the light at this power level for any length of time so I can’t verify it. On a 2 hour ride with it flashing the battery will drop to ¾ of its capacity. On my three-hour ride, I come back with it at half capacity. On a two-hour ride with me varying the intensity of the light it will come back around ¼ capacity.
I mount the battery under my stem. The battery comes with a silicone pad that protects the paintwork of my stem. I’ve placed a few felt patches on my frame to protect the rubbing I get when it contacts the head tube. I’ll get some proper plastic protective stickers then next time I’m at the bike shop to replace these to tidy it up.
I can’t see the battery level when I’m riding but so far, I’ve had no issues with the light running out of power on my rides.
Waterproof
The head unit is waterproof. I’ve ridden through a lot of weather with this light with no issues. For me, lights need to be waterproof. It’s an absolute requirement. This light gets left on my bike. After a ride in the rain, I’ll hose down my bike to wash all the grit off it. I’ll spray the light as well with no issues.
The battery I’m not too sure of. I think that it’s water-resistant, but I have noticed that I got a little fogging in the LED indicator when I washed my bike with the battery attached to it. As a result, the display status started flickering when the light wasn’t attached to the bike for a few days afterwards but it came right.
I now remove the battery from the bike before I wash it just to be sure.
Conclusion
So far, this light has been excellent. Good battery capacity, robust design, good features, and the perfect system for me. Time will tell if this light will last as long as my Ay-Up. But so far, it’s looking good. Would there be anything that I don’t like about it? The only concern that I have is that the battery might not be able to be submerged in water. Apart from that, it’s perfect for me.
Leave A Comment