
Don’t spend thousands of dollars on a time trial bike and aero bike equipment before reading this article. For the road cyclist time trial bikes are an expensive item to hang in their garage for most of the year, only to bring them out perhaps 2-5 times for those important Individual Time Trial events. In the pursuit of speed manufactures have gotten on the aero band wagon to offer bikes and components that promise true aero-ness to help you ride faster. This article discusses what aero equipment will give to the most bang for buck and provides information on the most important things you should to know to avoid the common pitfalls when buying time trial bikes and aero bike equipment.
But first a bit of background. It wasn’t that long ago that time trialling was done on a standard bike. That all changed perhaps when Greg LeMond won the 1989 Tour De France with the slimmest of margins (8 seconds) while using a set of aero bars against his rival; Laurent Fignon who was on a standard bike. Greg was at the beginning of the stage 50 seconds down on Laurent Fignon and posted the second-fastest time trial ever ridden in the Tour de France.
A November 1989 Bicycling Magazine article, supported by wind-tunnel data, estimated that LeMond may have gained 1 minute on Fignon through the use of the new aero bars. He also could have gained 16 seconds by wearing his aero helmet with a slightly elongated tail section for better aerodynamics, while Fignon rode bare-headed with his ponytail exposed to the wind. Fignon did perhaps gain a 5-second advantage by using a disk front wheel, while LeMond used a 24-spoke bladed radially spoked front wheel. Fignon finished third in the final time trial with an average speed of 53.59 kilometres per hour (33.30 mph). http://en.wikipedia.org/wiki/1989_Tour_de_France.
So let’s get into the basics.
Aero drag increases exponentially the faster you go

As you can see from this chart; using a normal bike aero drag starts exceeding rolling resistance at around 14 km/s while with an aero bike the speed is around 17 km/h. There is one very important thing to remember here. At lower speeds aero drag plays a lesser importance than at higher speeds. So up until these speeds (15-17 km/h), you are not really gaining anything from having any aerodynamic equipment whatsoever.
Aerodynamic equipment becomes more important the faster you ride. At 25 km/h aerodynamic equipment really does not play too much of a role in inhibiting your speed while at 40 km/h aerodynamic equipment becomes critically important. This can be seen in the chart. At 25 km/h there is only a difference of three 3 Newtons of force while at 40 km/h there are 9.5 Newtons; a threefold increase. At 50km/h is worse; a difference of 14 Newtons between an aero bike and a non-aero bike!
So you’ll benefit less from aerodynamic equipment if your average speed for a time trial event is around 30 km/h and you will benefit more if your average speed is 40 or 45 km/h. This is an important factor to think about when purchasing a time trial bike.
Another important factor to consider is that if your time trial course has hills in it, there is a good chance that your speed will drop as you go over them. As your speed drops the importance of being aero does as well. The more the gradient increases and the longer the hill the more that weight becomes the enemy, not aero drag. So in these cases, a heavy but super slick aero bike will only become a boat anchor and slow you down. For every kg of extra weight, you’ll need roughly an additional 3-5 watts of power.
Here is a chart of the estimated power requirements at different speeds. To compete at State and National time trial events we recommend that cyclists target around 300 watts at threshold for five minutes or more.
|
Average Power |
40km time trial (mins) |
Average speed km/h |
|
140 |
77.28 |
31.2 |
|
160 |
75.12 |
32.1 |
|
180 |
72.96 |
33.1 |
|
200 |
70.80 |
34.1 |
|
220 |
68.64 |
35.2 |
|
240 |
66.48 |
36.3 |
|
260 |
64.32 |
37.5 |
|
280 |
62.16 |
38.8 |
|
300 |
60.00 |
40.2 |
|
320 |
57.84 |
41.7 |
|
340 |
55.68 |
43.4 |
|
360 |
53.52 |
45.1 |
|
380 |
51.36 |
47.0 |
|
400 |
49.20 |
49.1 |
|
420 |
47.04 |
51.3 |
|
440 |
44.88 |
53.8 |
Source: Coyle, EF (1991) Cycling Science
So what aerodynamic equipment makes the most difference?
The table below gives rough estimates to the time saved over a 40km time trial. I don’t know for which speed this data is based so please only use it as a guideline as to which equipment gives you the best improvement.
| Equipment |
Maximum time saved over 40km time trial |
| Position |
6 minutes |
| Aero fork |
0.5 minutes |
| Disk and tri spoke wheels together |
1-1.5 minutes |
| Aero Helmet |
2 minutes |
| Skinsuit |
Unknown but there is a small improvement |
| Aero frame |
1-2.25 minutes |
Positioning
By far the biggest gain you can get is from an aero position on the bike. It’s all about reducing the frontal area and smoothing off the airflow leaving your bike and body. To do this you’ll need to get yourself a pair of aero bars, or some clip-on bars. Normal time trial bikes are shorter in the top tube and lower in the head tube than a road bike of the same size. This is to enable the correct positioning of the aero bars to get you into the correct aero position. Unfortunately, road bikes are not designed to run aero bars so the only way to optimize your position is to get a proper time trial frame. You can still improve your aero position on your road bike by clipping on some aero bars as these will provide you with a better aero position than using your normal drop road bars.
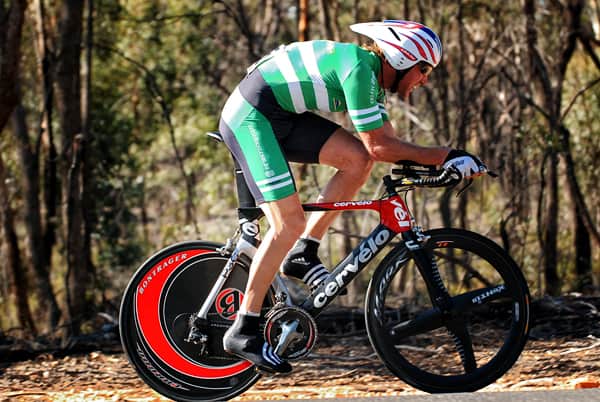
Picture 1. Here is an example of relatively good positioning. Flattish back, arms almost parallel to the ground. The only improvement would be to reduce the frontal area by lowering the head so that it is at the same height or lower than the back.
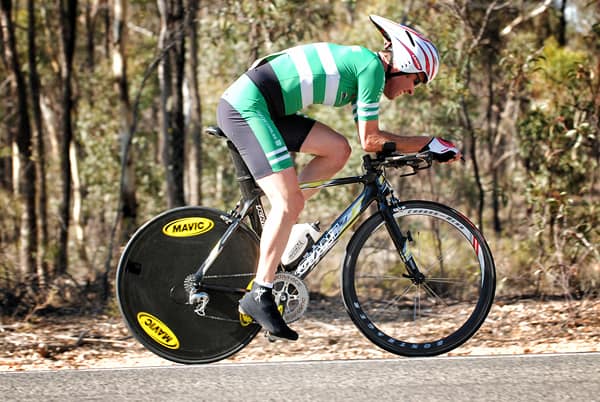
Picture 2. In this picture, the position is better. Arms are parallel to the ground with the upper arm being at right angles to the ground. The back is flat and more importantly, the head is in line with the body giving the best (or least) frontal area. The aero helmet up in the air results in drag, the helmet should be replaced with a helmet that provides a better streamline across the back.

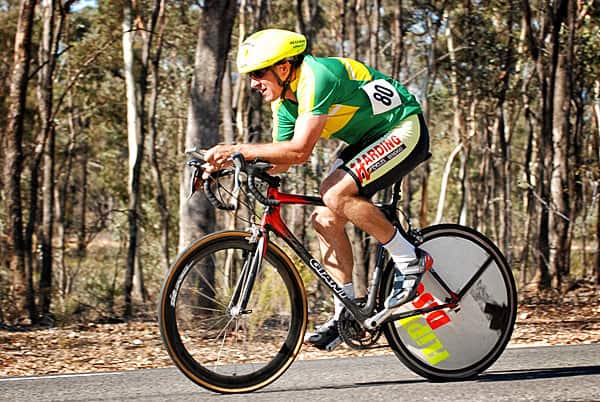
Picture 3. In this picture the back is very flat but again the frontal area could be reduced further by using a helmet that has a lower profile. This position requires very good flexibility.
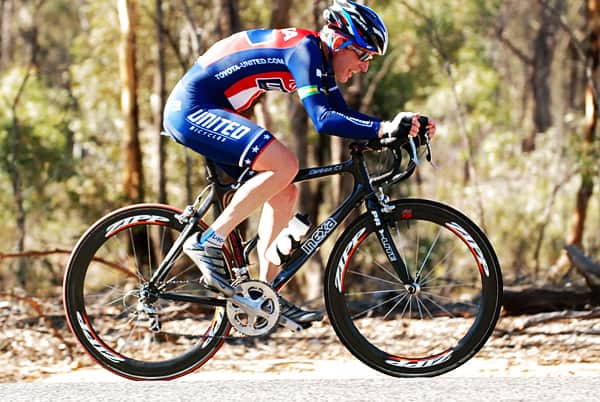
Picture 4. Road bikes usually have a top tube that is too long and a head tube too high to accommodate aero bars and provide a good aero position.
Picture 5. While you can get a good aero position with a standard road frame the optimal position is best provided with a proper fitting time trial frame.
As previously discussed, time trial frames are shorter in the top tube and lower in the front end to accommodate the time trial position. For this reason, it’s important to take this into consideration when purchasing a time trial frame. If you purchase a time trial frame with the same top tube length as your current road bike there is a good chance that it will be too long to get you into the correct aero position. This is because the ideal time trial position is when your arms come down at an almost right angle to the ground and then run parallel to the ground. While you can use a standard road frame the optimal position is best provided with a proper fitting time trial frame.
Backyard Positioning.
One of the simplest ways of setting up your position is to set yourself up and then take a side photograph and a frontal photograph while you are out riding your bike. Using these photographs, you can analyse your position and tweak it where you see necessary. Positioning for aero time trial bikes is however an art. To do it properly I recommend that you see a professional bike fitter who deals with aero positions. For the best results, there are companies that specialize in wind tunnel testing to ensure that your position is optimized against a measurable result. Also, the UCI has strict rules on the way a rider can be set up on a time trial bike. It’s important to check these rules and ensure that your position complies. A technical document describing these regulations can be downloaded from UCI’s site https://www.uci.org/inside-uci/constitutions-regulations/regulations
****Positioning Warning****
While getting a good aero position is important, it’s also important to ensure that you are still able to produce the same amount of power that you would while riding a normal racing bike. In many cases, the optional aero position may not be the optimal position for producing the maximum amount of power; robbing you of the speed you are seeking. In some cases, you may find that although you are more aero you will be riding slower than if you were riding a road bike.
When we are training cyclists for time trial events we have them do all their intervals and recovery rides on the time trial bike they will race on in the aero position so that they get accustomed to the position and ensure that they produce the best power possible.
One of the quickest ways we check to see if our cyclists are indeed producing the same amount of power is by using a power meter. The test is simple. Take a course that you regularly train on and preferably one that you use for your testing. It should be flattish, without traffic lights and be about 5-10 km long. Ride your road bike and record your average power several times to get an average, then do the same on your time trial bike. If the power is noticeably lower on the time trial bike then you’ll either need to change your position or do more training in the time trial position to help your body adapt.
What to look for in buying a time trial bike
The first and most important thing to consider when purchasing a time trial bike is to get the right size. We have discussed this in length already in this article. Once you have the right size and you are set up on it correctly, the next most important thing is wheels and then groupset. Wheels we’ll discuss later. As you’ll only be riding the bike several times a year there is no real performance improvement that you’ll get from purchasing the latest or top-of-the-line groupset. There is however a small improvement from using electronic shifting, but it’s not going to make that much improvement in time. Its therefore common to have a bike decked out with Shimano Ultegra, SRAM Force or Campagnolo Chorus groupset rather than Shimano Dura-Ace, SRAM Red or Campagnolo Record and then spend the money you have saved, on a great set of wheels that are going to give you a performance improvement.
Another thing to consider is the overall weight of the bike. While most time trial bike frames are relatively aero the weight becomes a consideration if you intend to time trial over courses that are either undulating or hilly. Generally, carbon time trial frames are lighter and more aero than aluminium frames.
Finally, there are some time trial frames that are not UCI compliant. You will not be able to race any of these types of bikes at State and National road racing events in Australia, period.
Wheels
On the road front disks, wheels are very difficult to manage. For that reason, it is never considered wise to ride with a front disk wheel. For road time trial bikes the general configuration is a deep rimed or bladed front wheel and a disc rear wheel. There are many brands of wheels on the market today. Personally, I like the Zipp wheels. They are one of the very few manufacturers that quote actual measurable figures for aero performance improvements. The things to look for a good set of wheels are good aerodynamic properties both from front and crosswinds, study construction and lightweight. I prefer my wheels to have slimmer, small bladed spokes, like the ones found on Zipp wheels to large thick bladed spokes.
Finally, in very windy conditions it’s recommended that you use shallow rimmed wheels. A standard configuration would be a Zipp 808 on the front with a Zipp disk wheel on the rear on calm days, while a set of Zipp 404s on a windy day. If you can only afford one set of wheels to go for a wheelset like the Zipp 404s to start with as you can use these for both road racing and time trialling.
Helmets
You may save money by buying a time trial bike from overseas. Buy only helmets purchased in Australia and New Zealand carry the AS/NZS 2036 safety sticker. You are unable to use any helmet that does not carry this sticker in any road event and track event (except the time trial and Individual Pursuit on the track). Helmets purchased from overseas do not carry this sticker. Commissaires do check aero helmets at State and National events and can check your helmet at any event. If you are found to be wearing a helmet that does not have an AS/NZS 2036 safety sticker you will be asked to find one that has the sticker before you will be able to race.
Other articles of interest:
Slow Down To Speed Up Your Hill Climbing – Cycle Up Hills Fast
Difference Between Training with Heart Rate and Power
How To Work Out Your Cycling Heart Rate Zones
What Does Your Resting Heart Rate Mean?
Heart Rate and Performance Parameters in Elite Cyclists
Leave A Comment